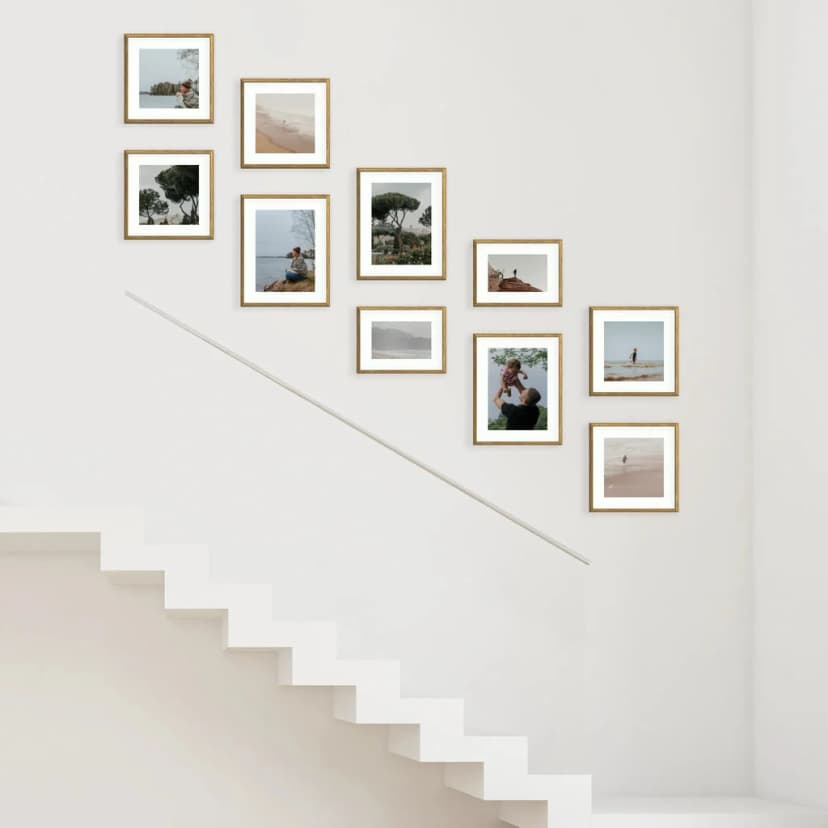
How to Hang a Photo Gallery Wall on Stairs
Hang a staircase photo gallery in about 15 minutes: measure the rise, pick a stepped layout, use Framky’s 1:1 template — no drill.
5 min read
Article
Three methods for aligning frames of different sizes on one wall — common baseline, shared horizontal axis, and invisible grid. Paper templates step by step.
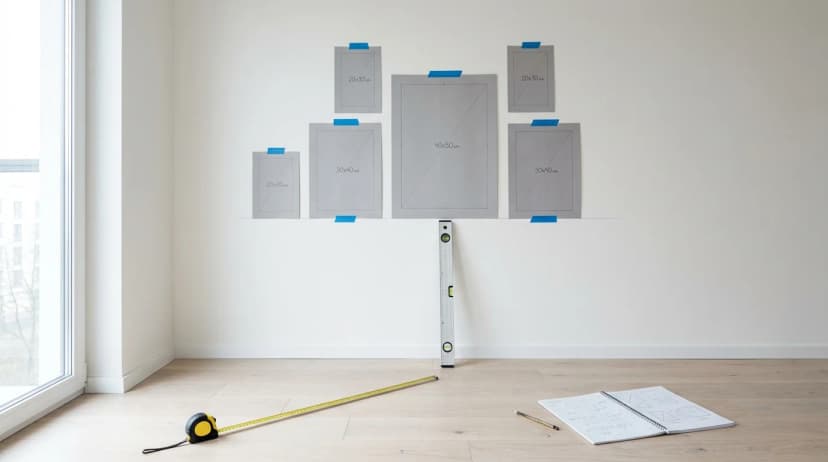
Frames of different sizes are aligned in one of three ways: (1) common baseline — all bottom edges at the same height, (2) shared horizontal axis — geometric centres of all frames on the same line, or (3) invisible grid — frames fitted into a regular network with a fixed 5 × 5 cm module. Before hanging the first hook, always prepare paper templates in the exact dimensions of your frames and tape them with painter''s tape to the wall for 48 hours.
A gallery with mixed-size frames is one of the hardest layouts to get right — and simultaneously the most popular, because it gives the "museum gallery" effect. The problem is that the human brain instantly catches the tiniest misalignment: 3 mm offset in a bottom edge ruins the impression that no amount of beautiful photographs will save. Good news: three simple geometric rules eliminate 95% of such mistakes.
Frame alignment is a deliberate choice in gallery design about which line or point on each frame should be shared across all frames on the wall. Without this decision, a mix of sizes feels random. Proper alignment ensures your eye moves through the composition smoothly, without getting "stuck" on irregularities.
| Method | What''s shared | When to use | Difficulty | Most common mistake |
|---|---|---|---|---|
| Common baseline | Bottom edges of all frames | Gallery above a shelf, dresser, sofa | Easy | Error in hook height due to different hanging-wire lengths |
| Shared horizontal axis | Geometric centres of frames (centre = half height) | Free-standing gallery, long hallway | Medium | Forgetting that frame centre ≠ photo centre (mat board shifts centre) |
| Invisible grid | Frame position within 5 × 5 cm grid module | Grid gallery with mixed sizes | Hard | Not keeping a constant module — 4 cm in one place, 6 cm elsewhere |
The simplest and most forgiving. All bottom edges of frames align on one horizontal line — like books standing on a shelf.
When it works best:
Drawbacks:
Key to success: the baseline must be perfectly level. Use a laser level or a long spirit level (minimum 60 cm). A 2–3 mm difference over 1 m is already visible.
The geometric centres of all frames lie on one horizontal line. Taller frames extend above and below the line equally; shorter frames extend and drop less.
When it works best:
Drawbacks:
Key to success: measure the height of each frame, divide by 2, mark that distance from the top. Mark this height on your paper template. All templates must have this same point at the same wall height.
Most demanding, but gives the most museum-like effect. You set a fixed spatial module (for example, 5 cm or 6 cm) and each frame is fitted into a grid with that module — its edges always align with grid lines.
When it works best:
Drawbacks:
Key to success: draw the grid on paper at 1:10 scale. Lay out frames on it. Measure distances between edges — they must be multiples of the module. Only then scale up to the wall.
Regardless of which method you choose, the procedure is the same.
Key principle: You can''t "correct" poor alignment after mounting. If the 48-hour test felt unconvincing, move the templates before you touch any hooks — that''s 15 minutes of work. Remounting already-stuck hooks is 3 hours and often damages the wall.
The gap between frames is the element with the biggest impact on how the gallery feels. Rules:
Most important rule: the gap must be constant throughout the gallery. 5 cm between first and second frame, then 7 cm between second and third — that''s an instant signal of carelessness.
If your frame has an asymmetric mat (common in portrait frames — wider margin at bottom), the geometric centre of the frame is higher than the centre of the photo itself. In method 2 (shared horizontal axis), you always count the frame centre, not the photo. If you mix them up and count photo centres, the whole gallery shifts by several cm.
Some frames hang on rigid hooks, others on wire (string) that stretches under the frame''s weight. A 0.5 cm difference on each frame makes adjacent ones misaligned. Solution: use only a rigid mounting system (Framky''s self-adhesive hangers have a rigid plate — no wire, no shift).
Between the 6-step procedure and the 48-hour test, a paper-template gallery often "shifts" due to draught. Use painter''s tape (blue) — it holds paper firmly but won''t damage the wall finish. Regular clear tape is too weak; brown packing tape with strong adhesive can damage paint.
Three scenarios where none of the three methods will improve the result:
How do I align 5 frames of different sizes in one gallery? Choose a method — common baseline (easiest) or shared horizontal axis. Prepare paper templates in the exact dimensions of your frames and tape them with painter''s tape to the wall. Check level, leave for 48 hours, then mount hooks at the marked points on your templates.
What gaps between frames in a gallery? Standard gap is 5–7 cm between adjacent frame edges. For a gallery with small frames (20 × 30 cm), go for 5 cm; for a gallery with large frames (40 × 60 cm and above), go for 7 cm. Most important: the gap must be constant across the gallery — changing from 5 to 7 cm in different places ruins the effect.
Can I mix portrait and landscape frames in one gallery? Yes, but the alignment method must be consistent. The safest for such mixes is shared horizontal axis (geometric centres of frames on one line). The baseline method will give a "ragged" top, which can be intentional but requires good judgment.
How far should a frame be from the wall edge? Minimum 15 cm from the wall edge, door, or corner. Less makes the gallery look "squeezed" into the corner. For larger galleries (over 2 m long), increase the margin to 20–25 cm — the brain needs more "breathing room" on bigger compositions.
How do I centre a gallery on a wall? Measure the total width of your composition (from the left edge of the first frame to the right edge of the last, including gaps). Subtract it from your wall width, divide the result by 2 — that''s your margin on each side. Mark it on the wall with a marker (to erase) or tape and start positioning your first template from that point.
Is a laser level essential? Not essential, but it speeds up work and eliminates 90% of errors. Alternative: a long spirit level 60–80 cm. A short 30 cm level is too short for galleries — it accumulates errors of 3–5 mm over 1 m, which are visible.
After aligning your frames, think about their number and sizes — How many photos in a wall gallery covers this in detail. For a complete step-by-step gallery planning method, see How to plan a photo gallery wall. If you''re still choosing a wall, check The psychology of photo placement — some walls simply work better than others.
When choosing frames for a mixed gallery, use Framky''s configurator, which offers ready-made sets of aligned sizes — complete with self-adhesive hangers.
Sign up and we'll send you a code with a bigger discount than the shop offers — plus occasional inspiration for your photo gallery wall.
Hang a staircase photo gallery in about 15 minutes: measure the rise, pick a stepped layout, use Framky’s 1:1 template — no drill.
Hang a photo wall in the stairwell: measure the rise, pick a layout along the banister, use a 1:1 template. No drill, about 15 minutes.
See gallery wall layouts with real sizes — 3, 5, 6, 8, 10+ frames. Match a Framky kit to your wall width, then hang with a 1:1 template.
Give it a try?
See how it works